| |
ELECTRICAL SYSTEM TROUBLESHOOTING AND MAINTENANCE.
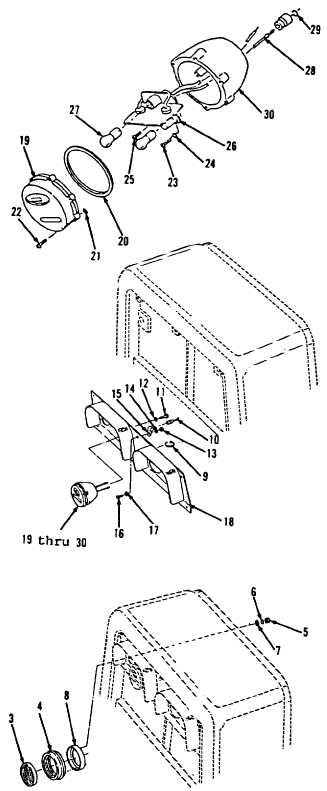
5 - 3 5 . S t o p / T a i l l i g h t s , B l a c k o u t S t o p / T a i l l i g h t s a n d M o u n t i n g . ( S h e e t 5 o f 6)
ASSEMBLY
18.
19.
20.
21.
Install two washers (29) and two
wire assemblies (28) at connectors
in housing (30).
U s i n g a c r o s s t i p s c r e w d r i v er
install two lamps (27), lampholder
(26), three screws (25), two lock
washers (24) and screws (23).
Using a flat tip screwdriver and
long round nose pliers, install six
screws (22) and washers (21) in door
(19).
Install seal (20) and door (19) in
housing (30).
INSTALLATION
22.
23.
24.
25.
26.
27.
Using two 9/16” open end wrenches,
i n s t a l l s u p p o r t ( 1 8 ) , f i v e w a s h er
( 1 7 ) , b o l t s ( 1 6 ) , c l a m p ( 1 5 ) , f i ve
washers (14) and nuts (13) on rear
g r i l l e s o f v e h i c l e.
Using a 9/16” open end wrench,
install items 21 thru 32 as an
assembly, two lock washers (12) and
b o l t s ( 1 1 ).
Connect two wire assemblies (10) at
connectors.
Install new tie strap (9) which
s e c u r e s b l a c k o u t s t o p l i g h t a nd
taillight lead to wiring harness.
Using a 3/8” open end wrench,
install ring (8), three washers (7),
lock washers (6) and nuts (5).
Assemble grommet (4) and lamp (3).
TM 10-3930-643-20
Go to sheet 6
5-181
|