| |
ELECTRICAL SYSTEM
5-34.
Front Work
This task covers:
TROUBLESHOOTING AND MAINTENANCE.
Lights, Headlights and Blackout Light. (Sheet 1 of 6)
a. Removal
b .
Disassemble
TM 10-3930-643-20
c . C l e a n i n g / I n s p e c t i o n d . A s s e m b l y
e .
I n s t a l l a t i on
INITIAL SETUP
Tools
Tool Kit, General Mechanic’s
Materials/Parts
Cleaning solvent P-D-680
Automotive
(App. C, Item 2)
NSN 5180-00-177-7033
Clean cloth (App. C, Item 10)
Small tag (App. C, Item 12)
Silicone sealant (App. C, Item 11)
Torques
Except for special torques shown,
all fasteners are tightened to a
standard torque.
Refer to
Appendix E.
EQUIPMENT CONDITION
References
Paragraph 5-47
Condition Description
Battery negative disconnected.
REMOVAL
1.
2.
3.
NOTE
A l l e l e c t r i c a l c o n n e c t i o n s , e x c e pt
those on the instrument panel,
are
s e a l e d a g a i n st
moisture
with
s i l i c o ne
sealant. Remove
a l l
silicone sealant before
performing
q aintenance on
e l e c t r i c al
connections.
All wire must be tagged when removed
from connector. Indicate whether
w i r e i s c o n n e c t e d t o p i n - t y p e or
socket-type connector.
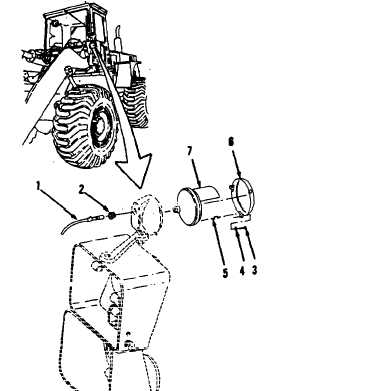
Disconnect wire assembly (1) at
connector in front left
s i d e o f
v e h i c l e.
Remove grommet (2).
Using a flat tip screwdriver, remove
s c r e w ( 3 ) , w a s h e r ( 4 ) , c l i p ( 5 ),
bracket (6) and lamp (7).
Go to sheet 2
5-171
|