| |
TM 10-3930-643-20
ENGINE, FUEL, EXHAUST AND COOLING TROUBLESHOOTING AND MAINTENANCE.
4-18.
Air Cleaner Assembly Elements. (Sheet 2 of 3)
REMOVAL
3.
U s i n g s l i p j o i n t p l i e r s,
remove
cotter pin (6) and use an
11/16”
open end wrench
to remove
nut
assembly (7) and safety element (8).
Discard cotter pin (6).
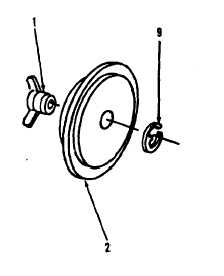
DISASSEMBLY
4.
Using long round nose pliers or
small flat tip screwdriver,
remove
clip (9) and wing
nut
(1)
from
access cover (2).
CLEANING/INSPECTION
5.
6.
7.
Do not wash primary element in
f u e l o i l , g a s o r s o l v e n t . Do
n o t o i l i t o r t a k e i t a p a r t.
Do not clean element by tapping
against a hard surface.
Do not use compressed air to
dry primary element.
Air
pressure will rupture a wet
element .
Protect element from
d i r t a n d
f r e e z i n g d u r i n g
drying.
Clean primary element (5) with warm
water and detergent.
R i n s e w i th
clean water.
Shake to remove excess
water.
Lay element on its side and
allow it to air dry.
Do not clean
safety element (8).
Clean air cleaner body with cloth
moistened with warm
water
and
detergent.
C l e a n a l l o t h e r p a r t s w i t h c l o th
moistened with warm
water
and
detergent. Refer to paragraph 2-8.
Go to sheet 3
4-73
|