 |
|||
|
|
|||
|
|
|||
| ||||||||||
|
|
 TM 10-3930-634-34
Crankshaft
Pulley
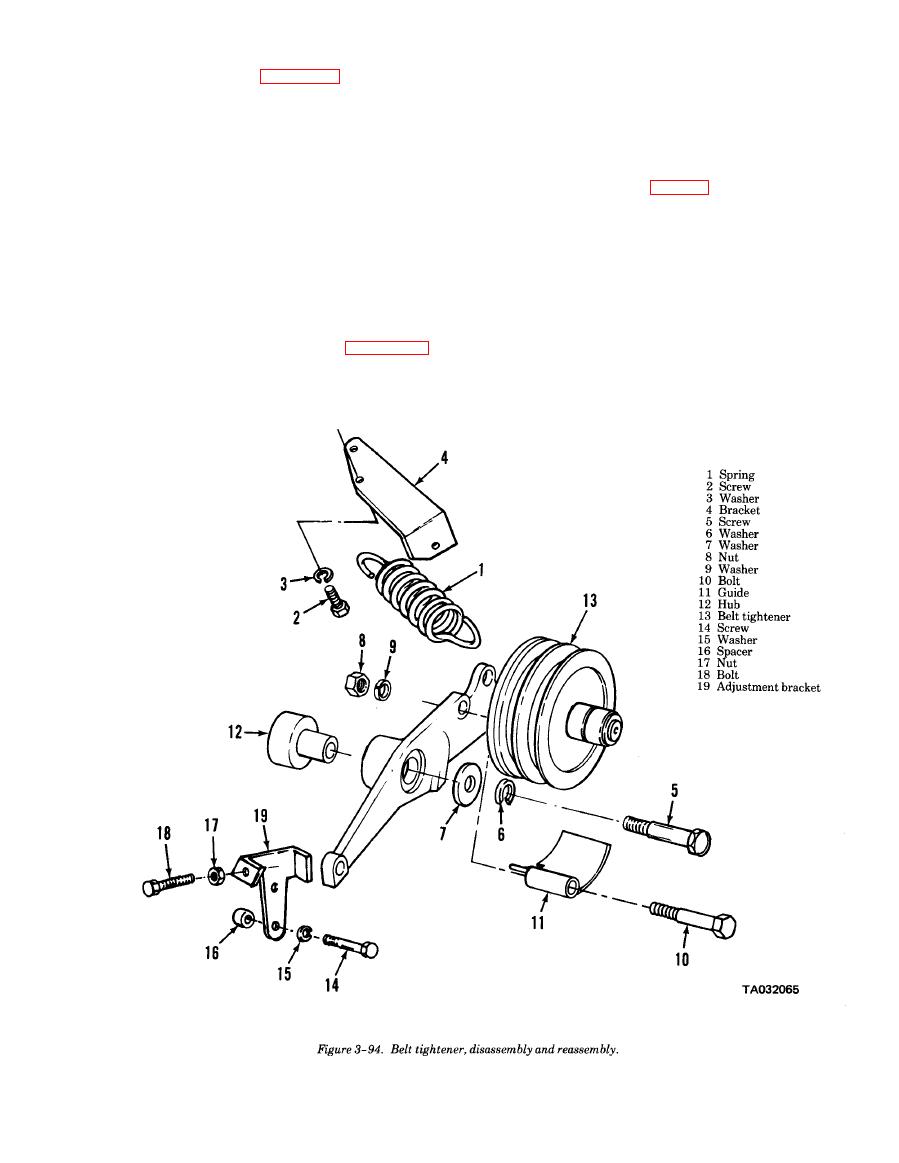
ble the belt tightener in numerical sequence as shown.
a. General. The crankshaft pulley is mounted on the
d. Cleaning and Inspection.
crankshaft and drives V-belts which power the cooling
(1) Clean all parts using cleaning solvent
fan and the generator.
P-D-680 or equivalent; use a stiff wire brush to re-
b. Removal.
move traces of rust and corrosion.
(1) Remove V-belts (TM 10-3930-634-12).
(2) Dry all parts using compressed air.
(2) Remove bolt (1, fig. 3-95), washer (2) and
( 3 ) Inspect mounting hardware for damaged
using a suitable puller remove pulley(3).
threads.
c. Cleaning and Inspection.
(4) Inspect belt tightener mounting bracket for
(1) Clean the pulley, washer and bolt with clean-
cracks.
ing solvent P-D-680 and dry thoroughly.
(5) Check that pulley rotates smoothly on bearing
(2) Inspect the pulley for cracks or worn grooves.
without binding.
Replace damaged or defective part.
(6) Replace all defective parts.
d. Installation. Install the crankshaft pulley in re-
verse of removal (b above). Tighten bolt to 200- 220 lb-
e. Reassembly. Reassemble the belt tightener in
ft. of torque if pulley is stamped with the letter "A." If
reverse of numerical sequence shown in figure 3-94.
f. Installation. Install the belt tightener (TM
pulley is not stamped with the letter "A, tighten bolt
to 290-310 lb-ft. of torque.
10-3930-634-12).
|
|
Privacy Statement - Press Release - Copyright Information. - Contact Us |