 |
|||
|
|
|||
|
|
|||
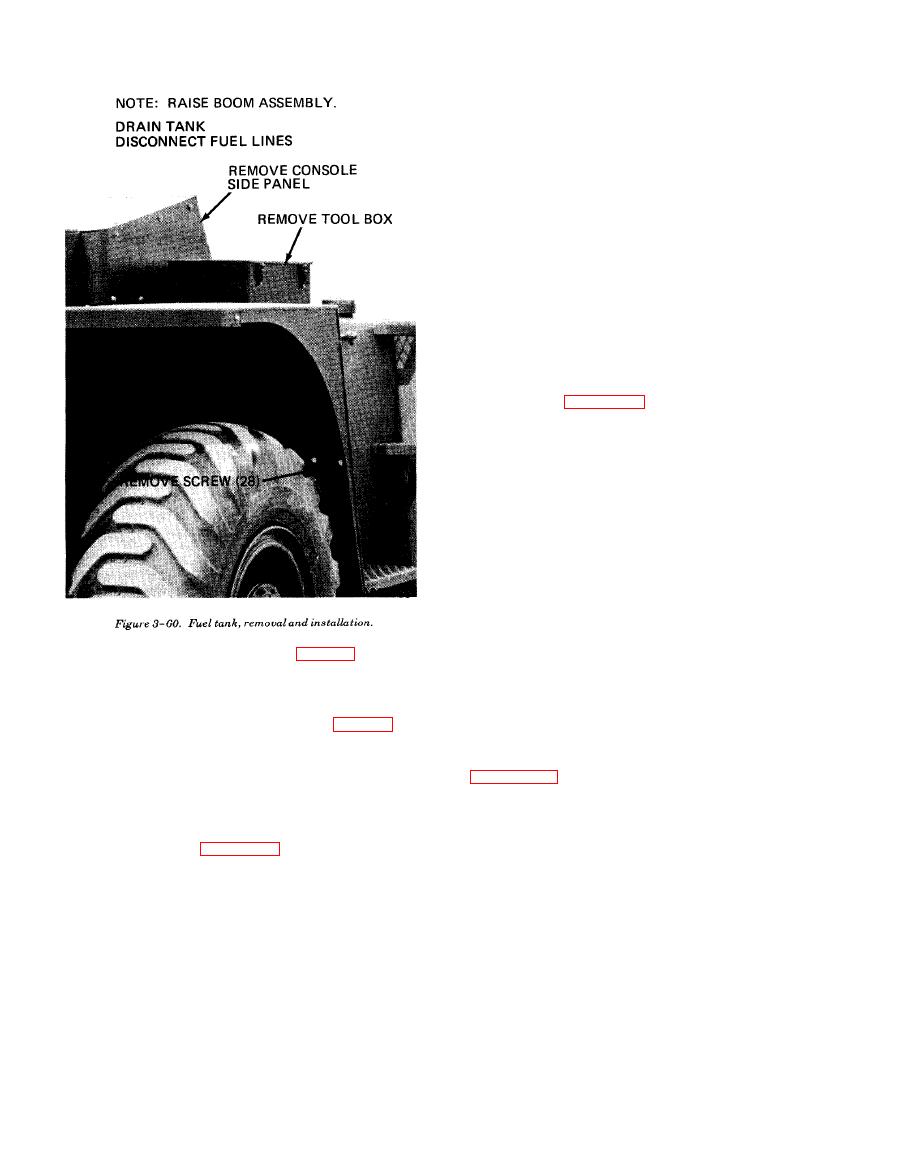
| ||||||||||
|
|
 TM 10-3930-634-34
wear. Inspect push rods for bent condition. Replace a
defective push rod.
(5) Inspect the push rod springs for damage.
Check the push rod spring tension. Use a spring tester
to check the push rod spring load. Replace the spring
when a load of less than 250 lbs. will compress the
spring to a length 2-9/64 inches.
(6) Inspect the cam follower holes in the cylinder
head to make sure they are clean, smooth and free of
score marks.
(7) Check the follower to cylinder head clearance.
The clearance must not exceed 0.006 inch with used
parts. Inspect the cam follower roller to make sure it
turns smoothly and freely on its pin, and that the
roller is free from flat spots or scuff marks. If the
roller is damaged, then inspect the cam lobe on which
it operates.
(8) Refer to figure 3-64 and check the clearance
between the cam roller and follower and the clearance
between the roller bushing and pin. If the clearance is
excessive replace the cam follower or install a new roll-
er follower set. When replacing a cam follower or in-
stalling a new roller set make sure the follower legs are
beveled.
CAUTION
Do not attempt to bore out the legs of a stand-
ard cam follower for an oversize roller and
pin set. This cannot be over emphasized be-
cause of the extremely close manufacturing
tolerances.
NOTE
Cam follower assemblies with letter "S"
stamped on the end of the roller, pin, and on
push rod remover tool on push rod with flatwasher and
the leg of the cam follower body are equipped
reinstall lock nut, tightening the lock nut until the
with oversize roller and pin sets.
cam follower spring is compressed.
(9) Remove and install the cam follower roller and
pin as follows:
(c) Pull the push rod and cam follower from the
(a) Clamp fixture securely in a vise as illustrated
bore in the cylinder head.
in figure 3-65 and place the cam follower in the
(d) Remove the lock nut, tool and flatwasher
groove in the top of the fixture, with the follower pin
from the push rod.
resting on top of the corresponding plunger in the fix-
c. Disassembly. Disassemble the rocker arms, in-
ture.
jector arm, push rod and cam follower in numerical se-
(b) Use a suitable drift and drive the pin from
quence illustrated on figure 3-63.
the roller. Exercise caution in removing the cam fol-
d. Cleaning and Inspection.
lower body and roller from the fixture as the follower
(1) Clean all parts with cleaning solvent (Fed Spec
pin is seated on top of a spring loaded plunger in the
P-D-680) and dry thoroughly. Make sure all oil
fixture body.
passages in the rocker arms, rocker arm shafts and
(c) Prior to installing a new pin, remove any
bracket bolts are open and clean.
burrs on the surface of the cam follower at the pin
(2) Inspect all parts for excessive wear or other
holes.
damage.
(d) Position the follower body in the groove of
(3) Measure the clearance between the rocker arm
the fixture with the proper size fixture plunger extend-
shaft and the injector rocker arm bushing. Measure
ing through the roller pin hole in one of the-legs of the
the clearance between the rocker arm shaft and the ex-
follower body.
haust rocker arm (which has no bushing). The maxi-
(e) Coat the new roller bushing and pin with
mum clearance is 0.004 inch with used parts.
lightweight engine oil.
(4) Inspect rounded end of push rods for excessive
3-46
|
|
Privacy Statement - Press Release - Copyright Information. - Contact Us |
