 |
|||
|
|
|||
|
|
|||
| ||||||||||
|
|
 TM 10-3930-634-34
(4) Replace all defective parts.
(2) Inspect pulley for cracks, and damaged or
worn grooves. Replace as necessary.
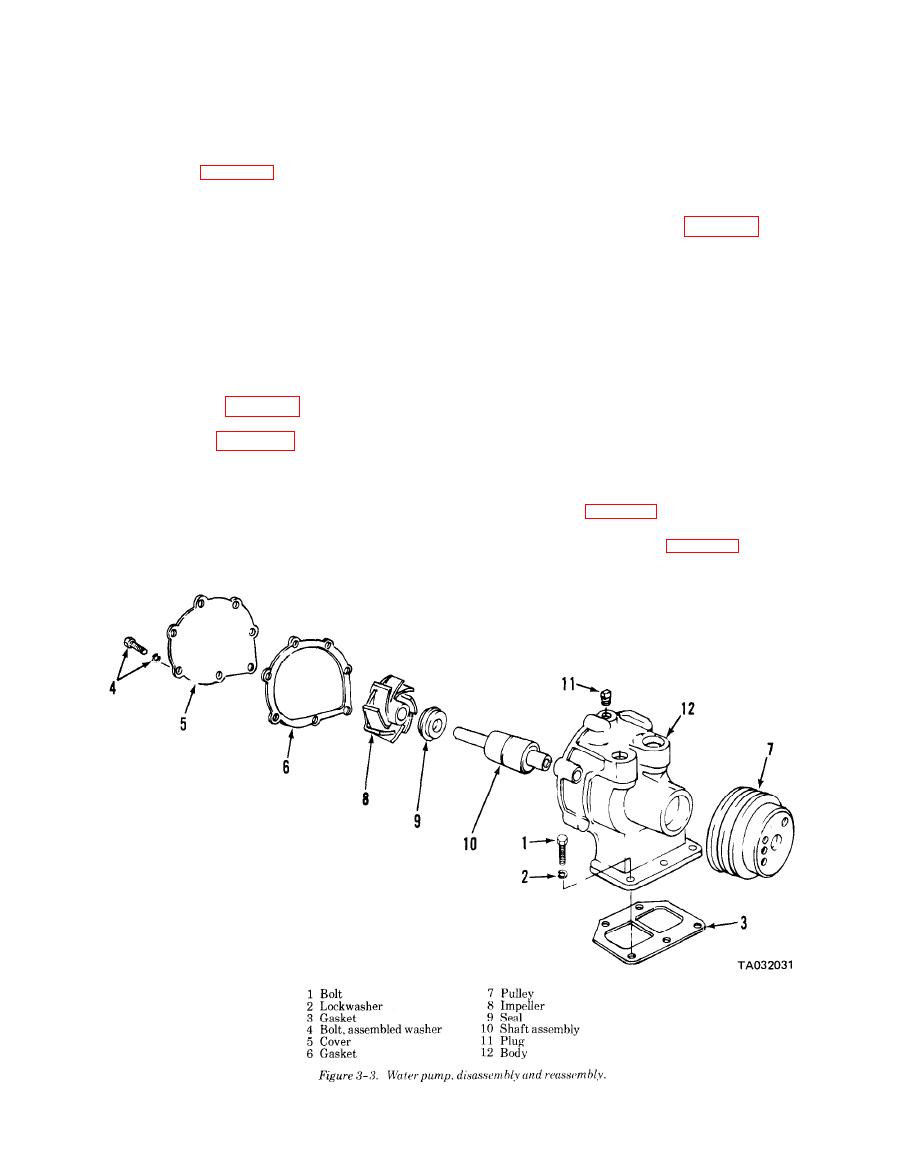
e. Reassembly.
(1) Upon reassembly, use a new seal, shaft as-
(3) Hold the shaft of the bearing and shaft as-
sembly, and cover gasket.
sembly and revolve the outer race of the bearing slow-
(2) Refer to figure 3-3 and reassemble the water
ly by hand. If rough or tight spots are detected, replace
pump.
the bearing and shaft assembly.
f . Installation. I n s t a l l t h e w a t e r p u m p ( T M
f. Reassembly. Reassemble the fan in reverse of
10-3930-634-12).
numerical sequence as shown in figure 3-4.
g. Installation. Install the fan and drive belts on the
3-4. Fan
engine (TM 10-3930-634-12).
a. General. The engine cooling fan is driven by a set
of V-drive belts from the crankshaft pulley. The fan is
3-5. Oil Cooler
mounted on a combination fan hub and pulley which
a. General. The oil cooler is attached to an oil cooler
rotates on a sealed ball bearing assembly.
adapter attached to the cylinder block. The flow of oil
b. Removal. Remove drive belts and fan from
is from the oil pump through a passage in the oil cooler
engine.
adapter to full flow oil filter, and then through the oil
c. Disassembly. Disassemble the fan in numerical
cooler core and cylinder block oil galleries.
sequence as shown in figure 3-4.
b. Removal.
d. Cleaning. Clean all parts, except the bearing and
(1) Drain oil cooling system by opening drain cock
shaft assembly (10, figure 3-4) with cleaning solvent
at bottom of cooler housing.
(Fed Spec P-D-680) and dry thoroughly. Wipe the
(2) Remove fuel filter, oil filter, and water pump
bearing and shaft assembly with a clean, lintless cloth.
(TM 10-3930-634-12).
e. Inspection.
(3) Refer to figure 3-5 and remove the oil cooler,
(1) Inspect the fan for loose blades, elongated
c. Disassembly. Disassemble the oil cooler in nu-
holes, cracks, or other damage. Replace a defective
merical sequence as shown in figure 3-6.
blade.
|
|
Privacy Statement - Press Release - Copyright Information. - Contact Us |
