 |
|||
|
|
|||
|
|
|||
| ||||||||||
|
|
 TM 10-3930-631-34
KEY to fig 7-9.
number of turns as when removed. Install screw (4),
1. Screw
12. Packing
lock washer (5) and nut (6) and tighten to secure yoke to
2. Nut
13. Backup ring
plunger rod.
3. Shaft
14. Packing
(7) Install lubrication fitting (8) in tube.
e. Installation.
Refer to TM10-3930-631-12 to
4. Screw
15. Spacer
5. Lock washer
16. Packing
install and adjust tilt cylinders.
6. Nut
17. Piston packing
7-7. Hoist Cylinders
7. Yoke
18. Bearing
a. Removal of Cluster Cylinder.
8. Lubrication fitting
19. Retaining ring
(1) Refer to paragraph 2-14 and remove the
9. Packing gland
20. Plunger rod
side shift carriage from the mast.
10. Nylon pellet
21. Tube
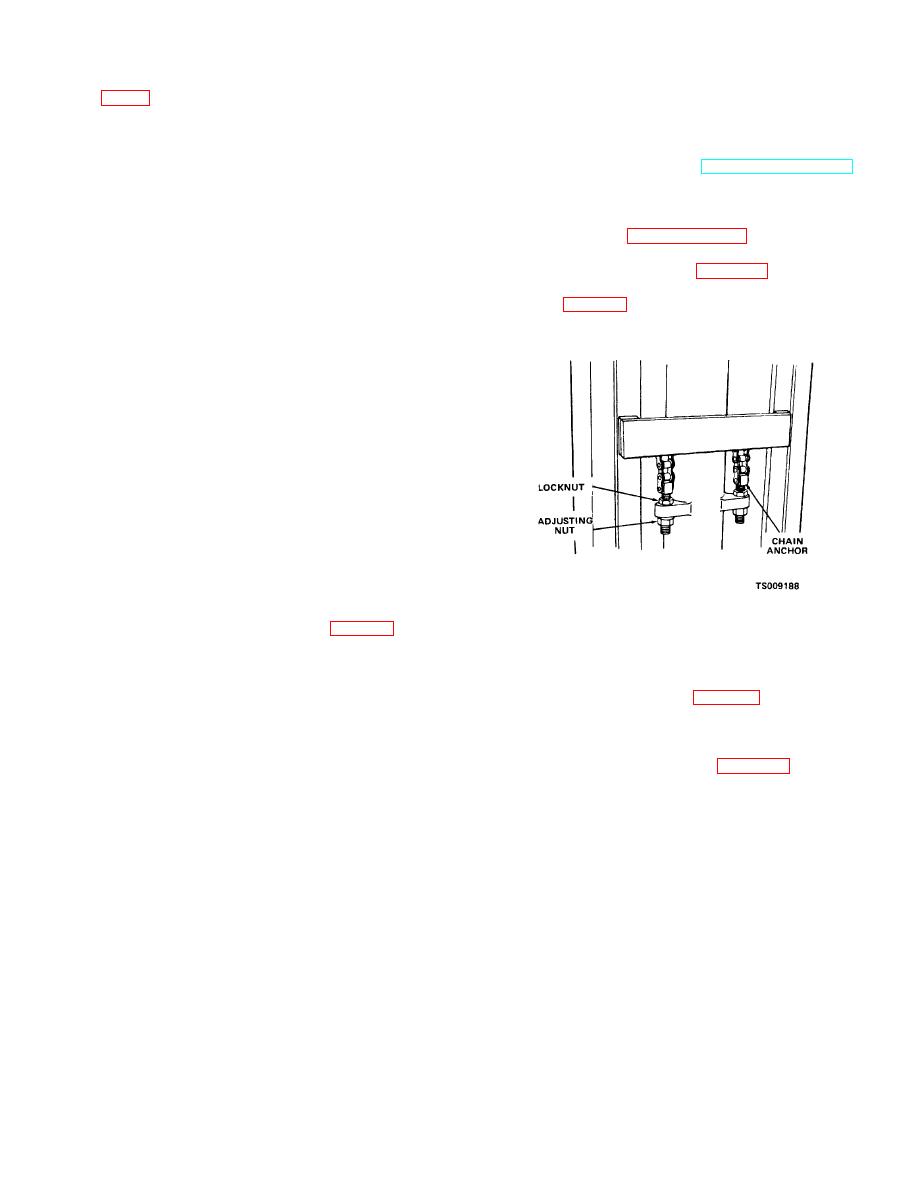
(2) Loosen lock nut (fig. 7-10) and remove
11. Wiper ring
adjusting nut. Remove chain anchors (23) and chain
(3) Remove packing gland (9). Remove nylon
guards (19, fig. 7-11).
pellets (101. Remove backup ring (13) and packing (14)
from outer circumference of packing gland.
(4) Inspect and remove rod wiper (11) and
internal packing (12) from packing gland.
(5) Remove plunger rod (20) from tube.
Remove bearing (18) and packing (17) from plunger rod
(20).
c. Cleaning, Inspection and Repair.
(1) Clean metal parts in cleaning compound,
solvent (Fed. Spec. P-D-680) and dry thoroughly.
(2) Check sliding surfaces of rod and tube.
Surfaces must be smooth and polished. If' surfaces are
nicked or damaged replace parts.
(3) Inspect threads on rod and yoke. Replace
parts if threads are damaged.
(4) Replace nylon pellet and all backup rings
and packing with parts in cylinder repair kit.
d. Assembly.
(1) Install new packing (17, fig.
7-9) and
Figure 7-10. Lift chains.
bearing on plunger rod (20).
(2) Install new packing (16) in spacer (15) and
install spacer on plunger rod.
(3) Remove lift chains from crossheads on
(3) Install plunger rod in tube. Install new nylon
cylinders. Disconnect tube (4, fig. 7-11) from between
pellets (10), packing (14) and backup ring (13) in
cluster cylinder and single cylinder. Remove fittings (5).
grooves on outer circumference of packing gland (9).
(4) Attach a suitable hoist to cluster cylinder and
(4) Position packing (12) and wiper ring (11) in
support cylinder while removing attaching parts.
grooves in inner circumference of packing gland.
(5) Remove screw (33, fig. 7-11) and lock
(5) Install gland nut over plunger rod and thread into
washer (34) from inner mast and cluster cylinder.
tube. Gland nut must be flush with outer edge of cylinder
tube.
(6) Install yoke (7) on plunger rod same
7-15
|
|
Privacy Statement - Press Release - Copyright Information. - Contact Us |
