 |
|||
|
|
|||
|
|
|||
| ||||||||||
|
|
 (1) Secure the starter motor in a bench vise at
(5) When the alternator is assembled, with-
the drive end of the unit. Be careful not to damage
draw the brush retaining wire through the hole in
the drive end housing.
the end frame. This will allow the brushes to
(2) Remove the two thru-bolts (1, fig. 5-6) and
contact the slip rings.
e. Installation. For the installation of the
slide the commutator end frame (2) and the field
frame (3) from the armature (35).
alternator refer to TM 10-3930-624-12.
(3) Remove the commutator end frame (2)
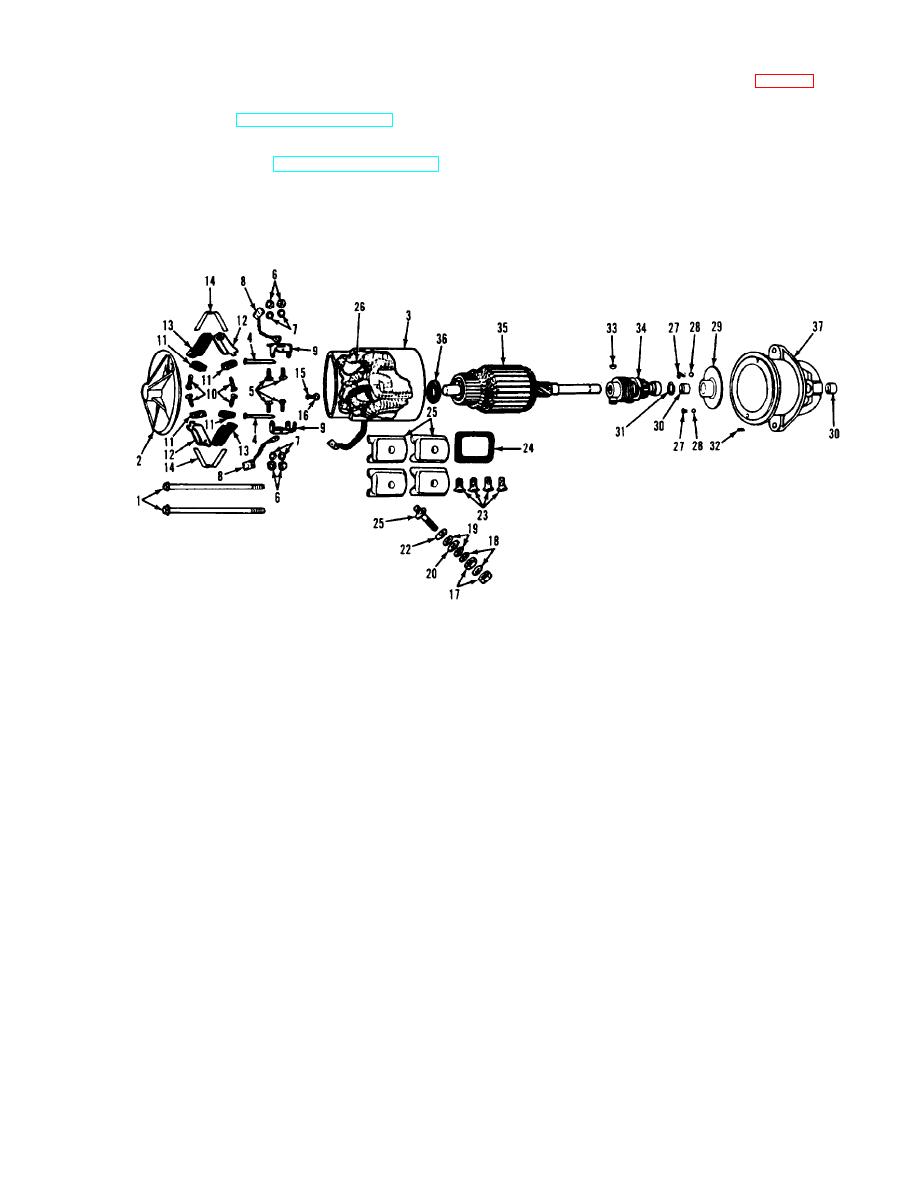
5-3. Starting Motor
from the field frame (3). Remove the pin (4), the
a. Removal. Refer to TM 10-3930-624-12 for
capscrew (5), nut (6), washer (7) and lead (8) from
the removal procedure of the starter motor.
the lead support (9).
b. Disassembly.
ME 3930-624-34/5-6
Washer
20.
1. Thru bolt
Grommet
21.
2. Find frame (commutator)
Stud
22.
3. Field frame
Capscrew
23.
4. Pin
Insulator
24.
5. Capscrew
Pole shoe
25.
6. Nut
Field coil
26.
7. Washer
Capscrew
27.
8. Lead
Washer
28.
9. Lead support
Plate
29.
10. Capscrew
Bushing
30.
11. Brush
Thrust washer
31.
12. Brush holder
Pin
32.
13. Brush holder
33.
Key
14. Brush spring
Drive mechanism
34.
15. Capscrew
Armature
35.
16. Washer
Spacer
36.
17. Nut
End frame (drive housing)
37.
18. Washer
19. Washer
Figure 5-6. Starting motor,
exploded view.
(6) Remove the nuts (17), washers (18, 19 and
(4) Remove the capscrews (10), brushes (11),
20), and grommet (21) which secure the terminal
brush holders (12 and 13). and brush spring (14).
stud (22). Remove the stud.
(5) Remove the capscrews (15) and washers
(7) Remove the capscrews (23), insulators
(10) from the field coil (26). Do not remove the
(24). and shoe poles (25) from inside the field
field coils. If tests indicate that the coils are
frame (3).
defective, replace the starter motor.
5-5
|
|
Privacy Statement - Press Release - Copyright Information. - Contact Us |
