 |
|||
|
|
|||
|
|
|||
| ||||||||||
|
|
 spline, and 6 on the rotor. Alinement will he
seal ring (11) from the piston (13). Remove the rod
correct in 6 positions and incorrect in 6
seal (14) from the rod (15).
positions. If the drive and the rotor slip out of
(6) If the grease fitting (16) is damaged,
position during assembly into the control valve
replace it.
unit. make sure to realine them correctly.
(7) If the bushing (17) requires replacement,
press it out with a suitable tool or arbor press.
(21) PIace the spacer (30) in position in the
rotor. If the spacer does not fit flush with the
surface of the rotor. the drive has not properly
engaged the warning pin. If the spacer fits flush.
place the end cap (29) in position on the assembly
and install two capscrews (28). Tighten them only
finger-tight to maintain alignment of the parts.
(22) Install the remaining capscrews (28) and
tighten them gradually and evenly to a torque valve
of 150 in. lbs.
(23) Reassemble the steering column (13-27),
the steering wheel (12) and the horn button
assembly, (1-10) by reversing the disassembly
procedure.
(24) Assemble the steering column to the
control valve unit. Rotate the shaft to aline the
s p l i n e s w h i l e b r i n g i n g t h e m o u n t i n g surfaces
together. Use the guide marks made during
disassembly to align the column flange correctly
with the mounting plate. Tighten the capscrews to a
torque of 280 in. Ibs.
f. Installation. Install the steering column and
control valve
unit by reversing the removal
procvedure. Tighten the bottom mounting hardware
first. to prevent stress on the column tube.
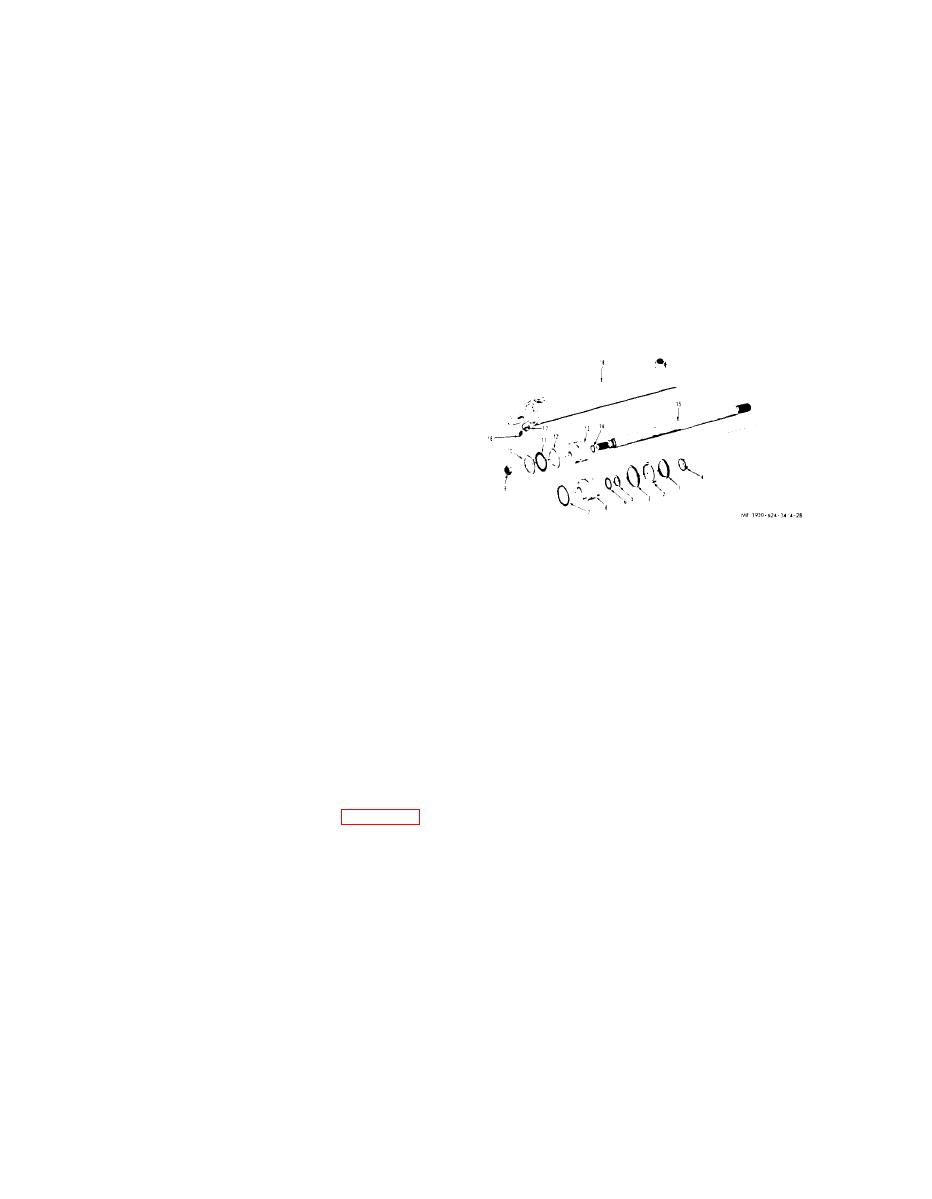
1. Lock ring
10. Lock ring
4-19. Steering Cylinder
2. Spacer
11. Seal ring
a. Removal.
3. Lock ring
12. Washer
4. Wiper
13. Piston
(1) Raise the rear of the truck until the
5. Washer
14. Rod seal
cylnder is accessible. Block the truck securely in
15. Rod
6. Seal
position.
7. Head seal
16. Grease fitting
(2) Place a pan under the cylinder ports and
8. Head
17. Bushing
disconnect the hoses from the cylinder. Plug the
18. Tube
9. Lock nut
Figure 4-28. Steering cylinder. exploded view.
cylinder ports and the hoses and tag the hoses for
identification.
(3) Disconnect the power steering cylinder
c. Cleaning. Inspection and Repair.
from the mounting bracket and remove the cylinder
(1) Clean the metal parts in a suitable solvent
front the truck.
and dry them with compressed air. Wipe the seals
b. Disassembly.
clean. using hydraulic oil as a solvent.
(1) Remove the lot-k ring (1. fig. 4-28)
(2) Inspect the tube bore, rod. head and piston
securing the spacer (2) in position and remove the
for cracks. scratches. scoring or other damage, and
spacer.
excessive wear. Inspect the seals for damage or
(2) Remove the lock ring (3) securing the head
excessive wear.
(8) in the tube (8) and remove the head (8) from
(3) Slight imperfections can he cleaned up
the tube (18) by pulling out the rod and piston
with a polishing stone. Replace any damaged or
assembly.
excessively worn parts.
(3) Carefully slide the head (8) off the rod
d. Reassembly. Reassemble
the cylinder by
(15). Remove the rod wiper (4), washer (5). and
reversing the disassembly procedure. Lubricate the
seal (6) from the head (8).
cylinder parts with a light coating of hydraulic oil.
(4) Remove the nut (9) securing the piston
Be careful not to damage seals against threads or
(13) to the rod (15). Slide, the piston (13) off the
sharp edges during reassembly. When installing the
rod (15).
head assembly, compress the lock ring. Keep it
(5) Remove the washers (10 and 12) and the
4-32
|
|
Privacy Statement - Press Release - Copyright Information. - Contact Us |
