 |
|||
|
|
|||
|
|
|||
| ||||||||||
|
|
 the engine rapidly a few times and observe move-
(4) Refer to c above and remove distributor cap,
ment of flywheel timing mark. If spark advance is
rotor, and dust cover.
working properly the mark should move counter-
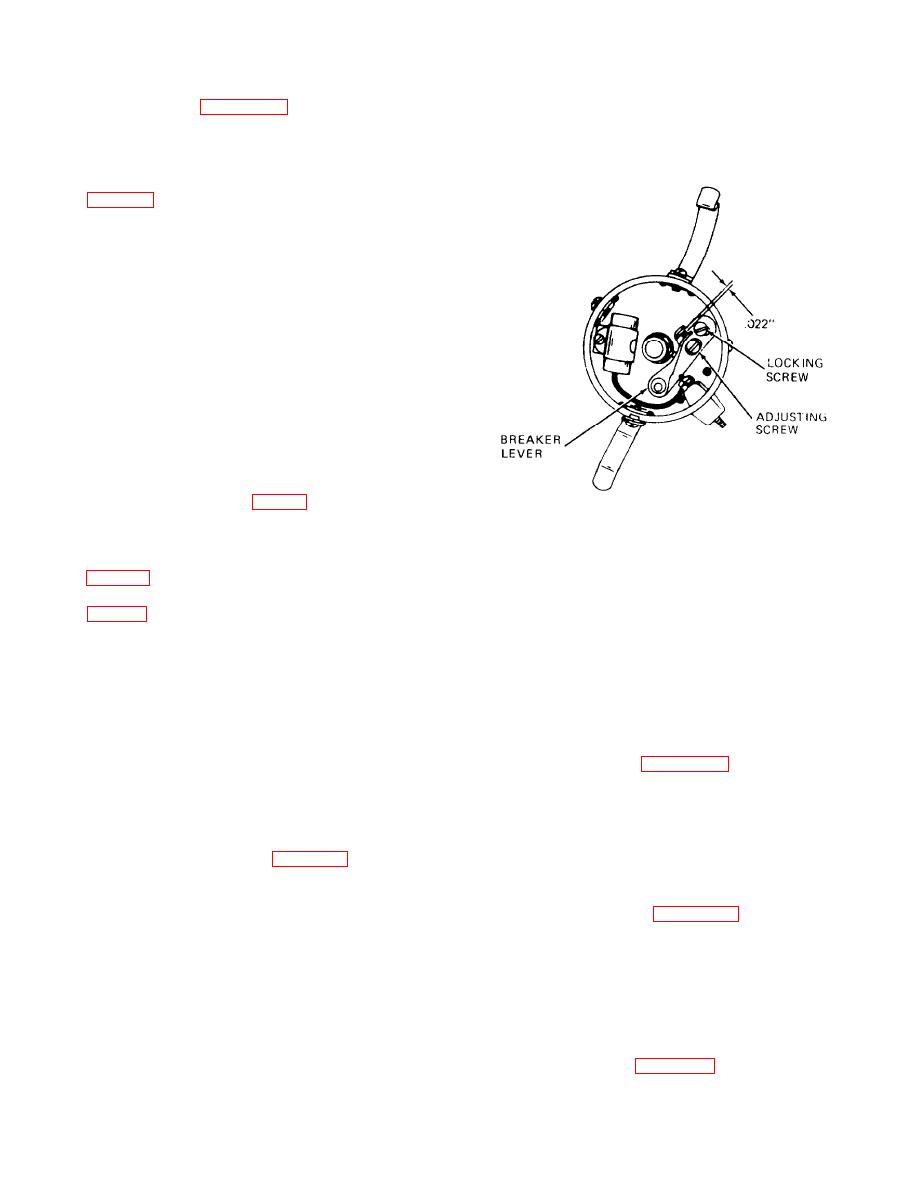
(5) Check and adjust contact point gap as follows:
clockwise on the flywheel during acceleration and
(6) Refer to figure 3-34. Rotate the crankshaft
drop back to 8 B.T.D.C. as the engine decelerates to
until the breaker lever rubbing block is on the high
idle speed.
spot on the cam, bringing the contact points to their
maximum open position.
(7) Loosen the contact assembly locking screw
points. Turn contact plate assembly adjusting screw
to adjust gap until a slight drag is felt when feeler
gage is slid between two contact points. Tighten
locking screw.
(8) Check point gap after tightening locking
screw.
(9) Refer to e above and install dust cover, rotor,
and distributor cap on distributor.
h. Ignition Timing Adjustment.
(1) Remove the timing cover from the flywheel
housing and remove spark plug from number one
cylinder.
(2) Place thumb over spark plug opening and
rotate the engine crankshaft by hand until T.D.C.
mark on flywheel is alined with reference line at
center of the timing hole (fig. 3-9).
(3) Adjust contact point gap to correct setting
(g above).
(4) Loosen screw at the distributor advance arm
(5) Rotate crankshaft until ignition timing line
Figure 3-34. Adjusting distribution contact point gap.
housing. This line is 4 B.T.D.C. (below top dead
3-45. Ignition Coil
center).
a. General. High voltage required to provide the
(6) Chalk another line on the flywheel at 8 B.T.
spark for engine operation is provided by the igni-
D.C. (approximately 1 teeth below 4 line).
tion coil. The coil is remotely mounted on the right
(7) Install number one spark plug on engine and
side of the engine compartment and is suppressed by
connect a timing light to the engine. Connect the
a 0.25 MFD capacitor.
timing light as follows: black lead to negative bat-
tery post, red lead to positive battery post, and blue
coil as follows:
lead to number one spark plug.
(8) Install a tachometer to register engine revo-
(1) Disconnect high tension cable from top of
coil. Disconnect capacitor and primary wires from
lutions.
the terminals at the sides of the coil.
(9) Start the engine and, using the carburetor
(2) Remove two screws and lock washers se-
idle speed adjusting screw (para 3-29), decrease idle
curing ignition coil, and capacitor, to frame and
speed so there is no apparent distributor advance or
remove coil and capacitor.
retard (approximately 300 to 350 rpm).
(10) Rotate distributor to set timing at 4 B.T.
coil as follows:
D.C. Timing light should flash and indicate the 4
(1) Install coil and capacitor on truck frame and
line on the flywheel.
secure with two screws and lock washers.
(11) Increase the idle speed to 500 to 550 rpm.
(12) Using the timing light again, check flywheel
(2) Connect capacitor and primary wires to
terminals at sides of coil. Connect high tension cable
timing and note whether timing has advanced ap-
to top of coil.
proximately 4 to the chalk mark at 8 B.T.D.C. If
d. Amperage Draw Test. Connect the ignition coil
advance is correct, tighten distributor advance screw.
in a circuit as shown in figure 3-36 and test as follows:
(13) With timing correctly adjusted, accelerate
3-33
|
|
Privacy Statement - Press Release - Copyright Information. - Contact Us |
