 |
|||
|
|
|||
|
|
|||
| ||||||||||
|
|
 (12) Remove pole shoe from each field coil,
(a) Insert the shaft in the armature as
then remove coil assembly.
far as possible, using hand pressure only.
Note. Record sequence of disassembly to
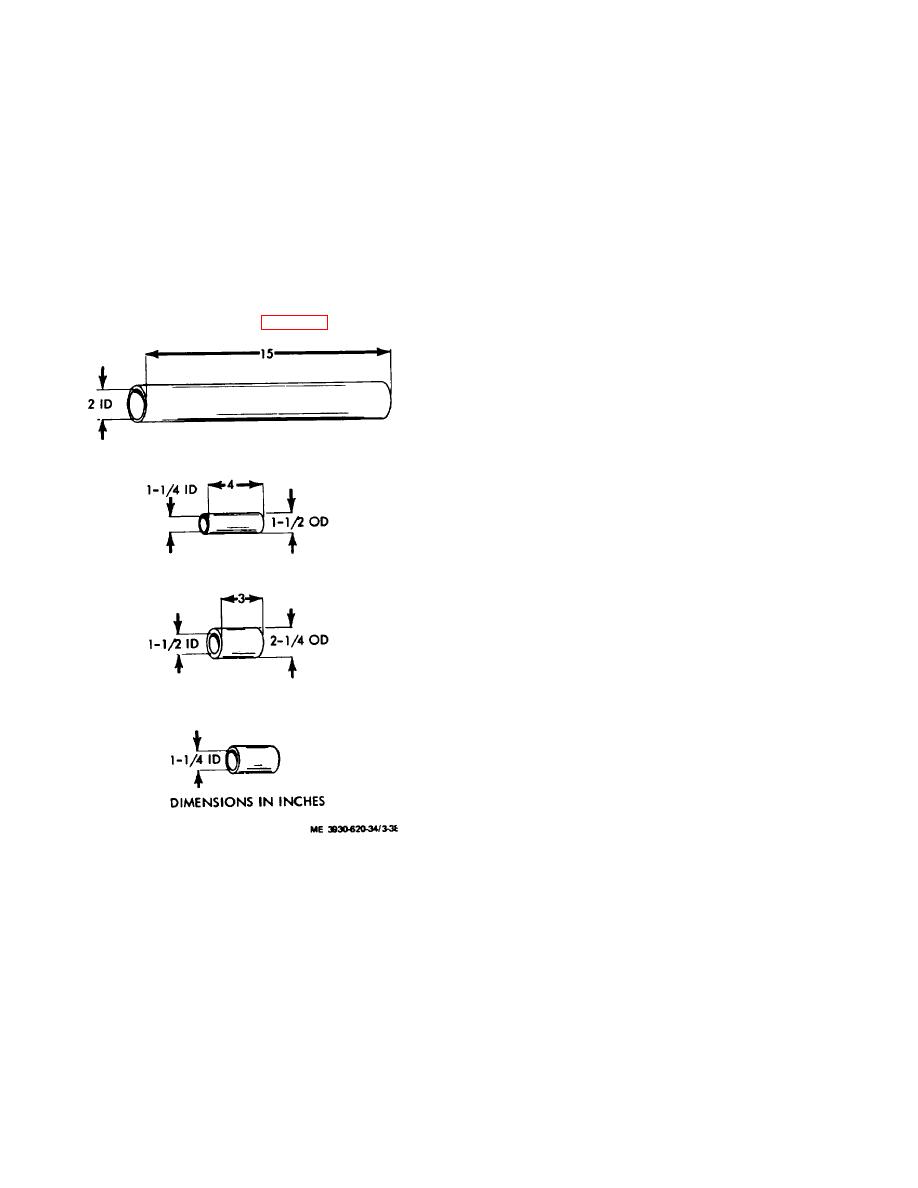
(b) With assembly in vertical position,
place a 3 inch long, 1 1/2 inch inside diameter, 2 inch
insure proper reassembly.
outside diameter pipe against the commutator sleeve.
(13) Disassemble and remove terminal studs if
(c) Using a 1 1/4 inch inside diameter
damaged.
f. Replacement of Armature Shaft.
pipe against the bearing shoulder (drive end), apply
vertical pressure until the shaft bottoms completely
Note. If armature or armature shaft is
against the core support.
damaged. perform the following:
g. Cleaning and Inspection. Clean and inspect
(1) Disassembly.
pump motor as follows:
Caution: Insure that top end of pipe
Warning: Use an approved cleaning
makes complete contact with the core from above
solvent in a well ventilated area when cleaning parts.
the shaft, but under the core rivets.
Caution: Armature and armature field
(a) Place drive end of armature shaft in
windings must be cleaned using a clean cloth
a pipe approximately 2 inches inside diameter and
approximately 15 inches long. (fig. 3-38.)
dampened in solvent. Do not soak, dip, or saturate
armature or field windings.
(1) Using a clean cloth dampened in solvent,
clean armature and field windings and allow to dry
thoroughly.
(2) Clean all other parts in solvent and allow
to dry thoroughly.
(3) Inspect all parts for wear, broken windings,
and damage.
h. Test.
Caution: Whenever connections have
to be soldered, a resin flux must be used. Acid flux
must never be used on electrical connections.
(1) Check armature for shorts by placing it on
a "growler" and with a steel strip or a hack saw blade
held on armature core, rotate armature.
If blade
vibrates, armature is shorted in area of the core below
the vibrating blade. Copper or brush dust in slots
between commutator bars sometimes cause shorts
which can be eliminated by cleaning out slots. Shorts at
crossovers of coils at core end can often be eliminated
by bending wire slightly and re-insulating exposed bare
wire. If short cannot be eliminated, armature must be
replaced.
(2) To test armature for grounds, place one
probe of test lamp on armature core or shaft and place
other probe on each commutator bar in turn. If lamp
lights, armature is grounded and must be replaced.
(3) To test for grounded fields, place one
probe of test lamp on field frame and other probe on field
terminal. If lamp lights, field coils are grounded and
Figure 3-38. Armature shaft pipes.
must be replaced, if ground cannot be located and
(b) a second pipe of 11/4 inches inside
required.
diameter, 1 1/2 inches (maximum) outside diameter, and
i. Commutator Repair.
Carefully inspect the
approximately 4 inches long against the bearing shoulder
commutator. If burned, rough, or out-of-round, it must be
on the commutator end of the shaft.
cut down and the mica undercut. Minimum diameter for
(c) Apply vertical pressure on the pipe
undercutting is 3 inches.
(commutator end) and press the shaft from the arm
attire.
(2) Reassembly.
3-56
|
|
Privacy Statement - Press Release - Copyright Information. - Contact Us |
