 |
|||
|
|
|||
|
Page Title:
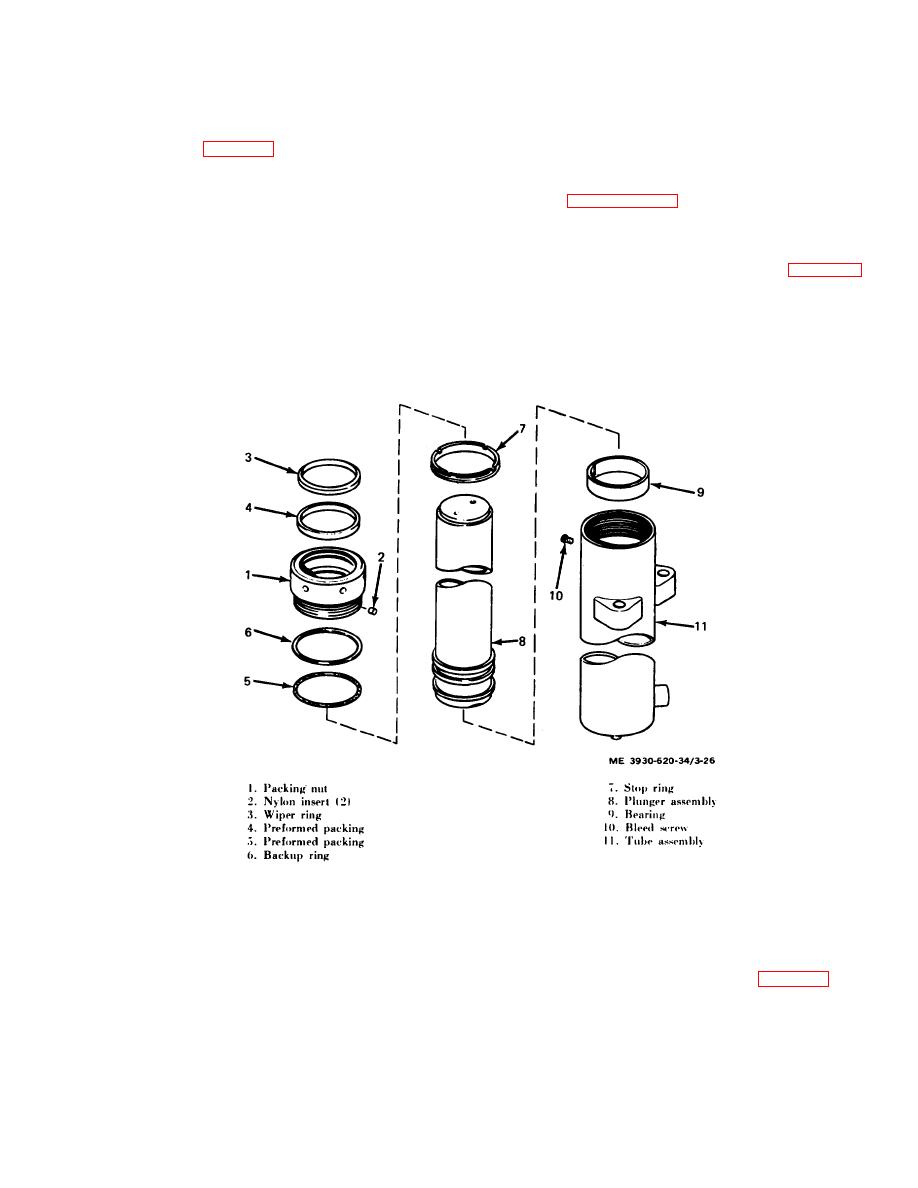
Figure 3-26. Primary lift cylinder, exploded view. |
|
||
| ||||||||||
|
|
 rough spots in the grooves. Repair or replace the piston-
(3) Lightly lubricate the wiper ring (2) with
rod assembly as necessary.
hydraulic fluid and install the assembly into the tube
(4) Inspect all metal surfaces where packings
assembly (13).
or seals are located. If the surfaces are scored or
(4) Tighten the gland nut with a spanner
nicked, replace the parts or resurface them.
wrench until the face of the nut is flush with the outer end
of the tube assembly.
(1) Install all new rings and packings in the
3-19. Primary Lift Cylinder
cylinder. Soak the packings in hydraulic oil before in
a. Removal. Remove the primary lift cylinder
stalling.
according to paragraph 2-17.
Caution: Do not use sharp tools or
b. Disassembly.
(1) Place the cylinder assembly in a bench
instruments when installing packings.
When
vise and drain any remaining oil.
installing rings, do not stretch them more than
(2) Remove the packing nut (1, fig. 3-26)
absolutely necessary.
from the tube assembly (11). Remove the wiper ring (31,
(2) Install the gland nut (1) on the piston-rod
preformed packing (4 and 5), and backup ring (6).
assembly (7). Screw the yoke (20) on the rod and
(3) Using a spanner wrench, remove the stop
secure in place with the screw (21), lock washer (22),
ring (7).
and nut (23).
(4) Remove the plunger assembly (8) and
bearing (9) from the tube assembly (11).
Figure 3-26. Primary lift cylinder, exploded view.
c. Cleaning, Inspection and Repair.
on the sliding surfaces, stripped threads, and other
damage which may cause internal or external leakage.
(1) Clean all metallic parts with cleaning
(4) Replace all defective parts.
solvent.
d. Reassembly.
(2) Discard all preformed packings.
(1) Place tube assembly (11, fig. 3-26) in a
(3) Inspect the plungers, packing nut, bearing,
vise. Be careful not to tighten excessively as this will
and tube assembly for cracks, nicks, scores, dents, wear
deform the tube.
3-41
|
|
Privacy Statement - Press Release - Copyright Information. - Contact Us |
