 |
|||
|
|
|||
|
|
|||
| ||||||||||
|
|
 FUEL
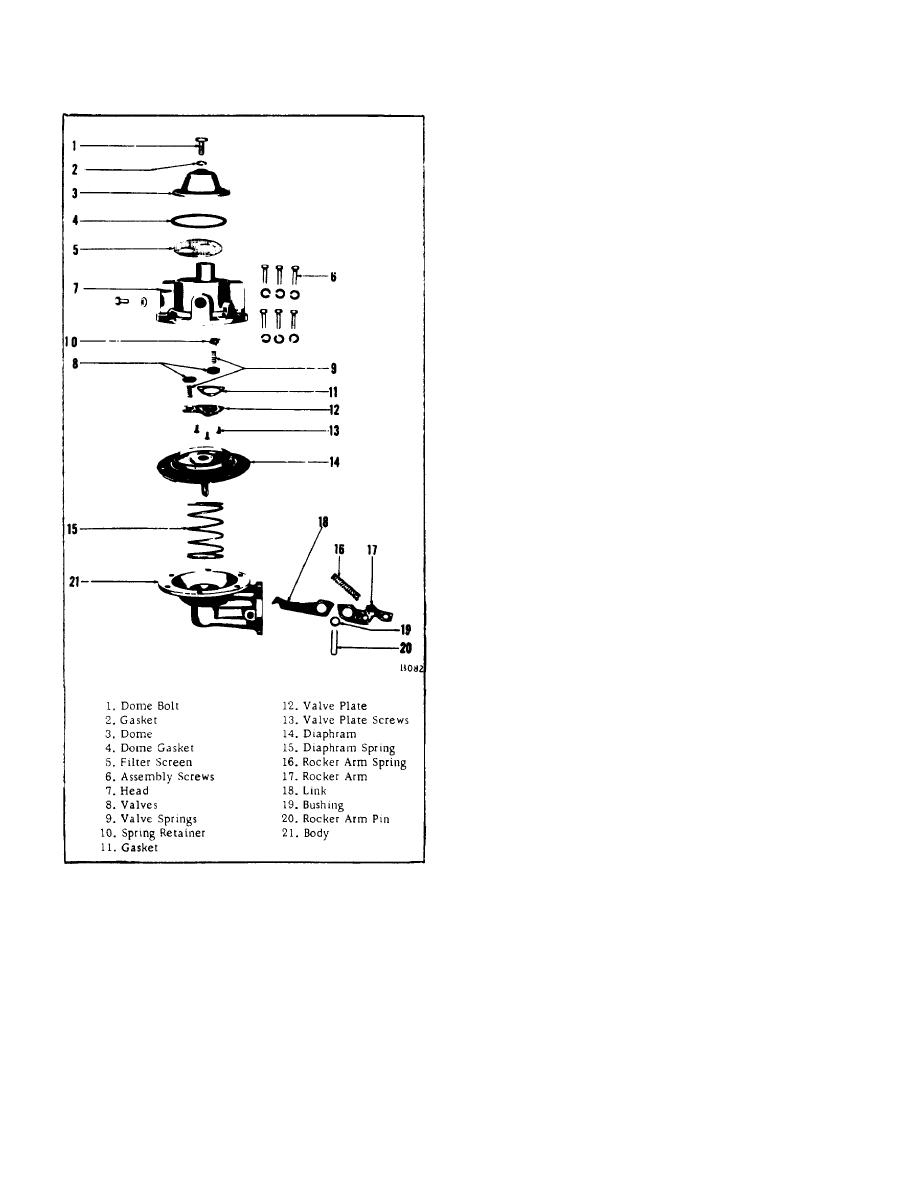
1. File match marks across a point at the union of
the head (7) and body (21). Unscrew the assembly
screws (6) and remove the head (7).
2. Unscrew the dome bolt. Remove the dome (3),
dome gasket (4) and filter screen (5).
3. Unscrew the three valve plate screws (13). Lift
out the valve plate (12), plate gasket (11), valves (8),
valve springs (9) and the valve spring retainer (10).
4. Pry the' rocker arm spring (16) out of position,
using a screw driver inserted-in the coils of the spring.
5. With the heel of the hand on the diaphragm
(14), compress the diaphragm spring (15) and unhook
the diaphragm from the link (18).
6. Drive the rocker arm pin (20) out. Remove
rocker arm (17), linkage (18) and bushing (19).
D. CLEANING AND INSPECTION
1. Clean: all parts with solvent.
NOTE
The following are points where wear affects fuel
pump performance as noted:
a. Worn linkage causes slow priming and
lack of fuel.
b. Worn pull rod causes improper
diaphragm action.
c. Dirty valve seats or worn valves result
in reduced fuel flow.
d. Ruptured diaphragm reduces the fuel
pressure and flow.
2. Visually check the cover and body for cracks
and breakage. Inspect for diaphragm flange warpage by
testing on a smooth flat surface. Examine all threaded
holes for stripped or crossed threads. Broken, damaged
or severely warped castings must be replaced.
3. Replace valves if obviously worn or damaged.
Figure 6.
B-44
|
|
Privacy Statement - Press Release - Copyright Information. - Contact Us |
